7 Pro Tips for a Showroom-Finish Car Wash at Home
Drvyn
Content Writer
Washing your car at home can be a rewarding experience, saving you money and giving you a great sense of satisfaction. However, there's a big difference between just getting the dirt off and achieving a professional, scratch-free, showroom shine. Many common washing techniques can actually inflict fine scratches and swirl marks on your paint. By following a few pro tips, you can elevate your home car wash game significantly.
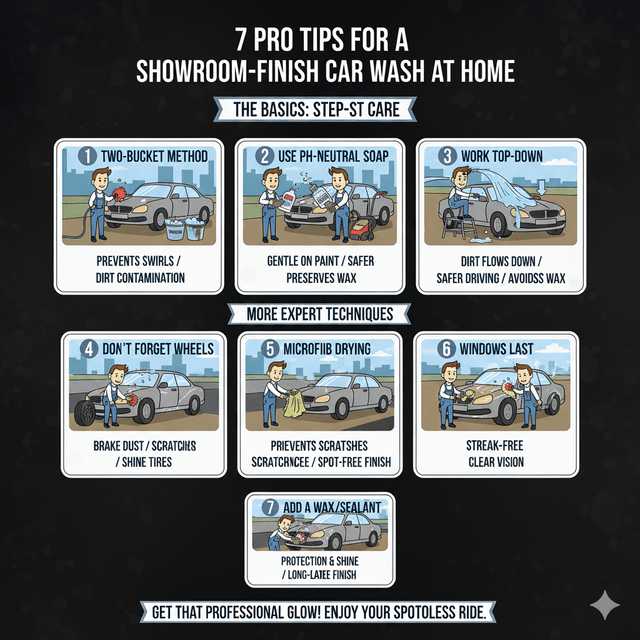
1. Use the Two-Bucket Method
This is the single most important technique to prevent scratches. Instead of one bucket, use two. Fill one with your car shampoo solution (the 'Wash' bucket) and the other with plain, clean water (the 'Rinse' bucket). After washing a small section of the car, dunk your dirty wash mitt into the Rinse bucket first to dislodge the dirt and grit. Then, you can safely put it back into the Wash bucket for fresh suds. This stops you from picking up dirt and rubbing it all over your car's paint.
2. Choose the Right Tools and Chemicals
Never use dish soap, laundry detergent, or household cleaners on your car. These are too harsh and will strip away the protective wax and sealant on your paint. Invest in a quality, pH-neutral car shampoo. Also, ditch the old sponges and towels. A high-pile microfiber or lambswool wash mitt is much gentler on paint. Use separate, clean microfiber towels for washing, drying, and other tasks.
3. Start with the Wheels
Always wash your wheels and tires first. They are the dirtiest part of your car, covered in brake dust which is highly abrasive. Washing them first, with separate brushes and a separate bucket if possible, prevents you from transferring that brake dust to your car's paintwork later in the process.
4. Pre-Rinse and Work from Top to Bottom
Before you touch the car with a mitt, give it a thorough rinse with a hose to remove as much loose dirt and debris as possible. When you start washing, always work from the top of the car downwards. The lower sections of the car (bumpers, side skirts) are the dirtiest. Washing from the top down ensures that you're not dragging the heaviest grime up onto the cleaner panels.
5. Wash in Straight Lines, Not Circles
The age-old 'wax on, wax off' circular motion is a major cause of swirl marks. If you do happen to inflict a very fine scratch, a straight-line scratch is far less visible to the human eye than a circular one. Wash and dry each panel using gentle, overlapping, straight-line motions.
6. Don't Wash in Direct Sunlight
Washing your car in direct, hot sun is a recipe for disaster. The heat will cause the water and soap to evaporate too quickly, leaving behind stubborn water spots and soap residue that can be very difficult to remove. Always wash your car in the shade or during the cooler parts of the day, like the early morning or late evening.
7. Use a Proper Drying Technique
Letting your car air dry will leave mineral deposits (water spots) all over the surface. Instead, use a high-quality, plush microfiber drying towel or a leaf blower/car dryer to remove the water safely. The 'blotting' or 'patting' method is gentler than rubbing. Lay the towel over a section and pat it dry, then lift and move to the next section.
Washing your car the right way is the foundation of good paint care. While these tips will greatly improve your home results, for a truly deep clean and paint restoration, nothing beats a professional service. For a next-level clean, book a professional detailing service with Drvyn's expert partners.
Enjoyed this article?
Share it with your network
Join the Conversation
Share your thoughts and insights about this article